| Bally Installation and Maintenance |
Five easy steps to assemble a Bally Walk-In
|
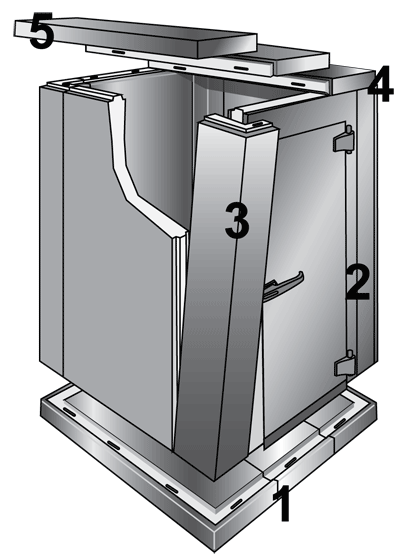 |
- Position floor panels. Use Speed-Loks to connect the panels. A level building floor is necessary.
- Start assembling walls by joining a wall panel to a corner panel. Lock both panels to the floor. Each vertical panel contains at least four Speed-Loks. Because locks are actuated from the inside, Walk-Ins can be installed close to existing walls.
- Finish assembling walls by locking together remaining vertical panels. Install the fourth corner panel last.
- Begin assembling the ceiling by locking the end ceiling to the side walls.
- Complete the ceiling assembly by locking the remaining ceiling panels together and, in turn, to side walls.
|
| | INSTALLATION MANUAL |
| |
SERVICE MANUAL |
Bally's Speed-Lok Diaphragmatic Joining System is Strong and Versatile
|
Bolstered by a steel strap foamed into the panels, Bally structures are strong and easy to use. The Speed-Lok’s simplicity allows a structure to be assembled in a fraction of the time compared to conventional construction; lowering installation costs. The Speed-Lok also aids in the ability to expand, disassemble, or relocate a Bally structure with ease.
The Bally Speed-Lok, consisting of only two simple assemblies, is operated by a single tool: a hex wrench.
|
- The Locking Pin is a steel rod precisely positioned so that the locking arm engages it tightly.
- The Locking Arm is cam-mounted with a hooked end. When a hex wrench is used to turn the arm, the movement of the cam first enables the hook to engage the pin and then draws the panels tightly together.
| SPEED-LOK PAMPHLET
|
 |
Bally Walk-In Cooler and Freezer Maintenance
|
To provide safety, obtain optimum performance, and extend the life of this product, we recommend these procedures:
- Inspect the condition of abrasive anti-skid strips monthly. Replace or add additional strips when necessary.
- Keep all walkway surfaces clean and free of spilled liquids and food particles.
- Inspect refrigeration equipment frequently for proper function of evaporators, drain pan heaters, defrost controls and drain line heaters.
- Condensate water must never be permitted to drip on the Walk-In floor. Refer to the Refrigeration System Instructions for proper condensate drain line instructions.
- If entry doors are to be held open for periods longer than 5 minutes, a vinyl strip curtain should be used.
- Frost or condensate appearing around the door jamb may indicate that the electric heater is inoperable.
- All metal surfaces and magnetic door gasketing should be cleaned frequently with a mild detergent and hot water. Remove all soap film and thoroughly dry with a clean cloth. Washing down equipment with a high pressure hose voids the warranty.
- Digital and Electronic Alarms must be protected from moisture, or warranty is null and void.
Promptly call a Bally dealer or a qualified service person to correct any abnormal operation of the Walk-In or Refrigeration System. |
|